I made fun of Mac forums in an earlier post, but if you haven't checked out the MacRumors Forums, you should because they have a still-active PowerPC section. Here are a few threads you may find useful:
F.A.Q. for Powerpc Macs
Video on PowerPC - Part 1: Playback on G4/G5
OpenMark results on PowerPC Macs
That last one is a long thread benchmarking graphics cards. Stay out of the flame wars. They could get hairy in there.
Tuesday, March 27, 2012
Monday, March 19, 2012
Installing Debian Linux on PPC Part V - Bugs & Quirks
[4/24/15: Updated for Jessie stable]
So now you have your system all up and running, but there are a few things that don't quite work right. If you've installed Testing some bugs are to be expected, but there are other bugs and general quirks on PowerPC Linux that have been around a long time and will likely persist.
Boot Parameters
Among those quirks are system freezes from poorly supported drivers. This is where boot parameters come in handy. If your radeon driver is causing you persistent lock-ups, you can restore stability by forcing PCI mode by entering this at the second yaboot screen:
The "Linux" tells it to boot the default kernel, and everything that follows are the boot parameters.
One user reports they had system freezes until they entered the parameter "irqpoll", perhaps related to multiple devices being attached.
To make boot parameters permanent so don't have to type them in every time, edit your kernel entries in /etc/yaboot.conf so they look something like this:
Mac OS 9 Issues
Another bug that persists is the infamous disappearing partition bug. Every time you run through the Debian installer, it messes up your Mac OS 9 drivers making any OS 9 partition unbootable. Fortunately there's an easy fix. Simply boot with your Mac OS install CD, launch Drive Setup, highlight your hard drive on the list, and from the Functions menu select "Update Driver". You can now boot into your OS 9 partition.
Another thing you should know about OS 9, never use the Startup Disk control panel to choose a startup disk (this applies to OS X's Startup Disk system preference, too). It messes up Yaboot and you won't be able to boot into Linux. If this should happen, reset the PRAM (hold down command + option + p + r keys on startup). If that still doesn't restore Yaboot, boot with the Option key held down and choose your Linux partition on the boot screen. Then when you're safely in Linux, run "sudo ybin -v" to reset Yaboot.
Dual booting between Linux and Mac OS 9 also has an issue with system clocks. While your Debian system is set to UTC time, your OS 9 system is set to local time, so though your Linux time may be correct, you Mac clock can be several hours off. Solve this with:
Replace the 1 with 0 to switch back to UTC time.
Other Issues
Occasionally Debian may install with your system time one hour off (or maybe it's just me and the deb-installer hates me). To correct it, run the
As mentioned before, KMS is glitchy and blocks suspend from functioning, so check the Part IV - Graphics section for suggestions.
And with all sound issues, check the Part IV - Sound section for fixes.
There's a new bug afflicting PowerPC Iceweasel users where their bookmark folders aren't showing up in the bookmarks menu or toolbar, though they can still be accessed in the Bookmarks Library and Sidebar (and the bookmarks within them are still accessible with auto-complete).
I've noticed a backlight issue on my iBook. DPMS turns off the backlight after 10 minutes as expected, but the backlight doesn't turn on after I wake it up. The only way I can turn on the screen is to press the brightness keys. This may be because my iBook runs with KMS disabled.
If you have a tray-loading Mac, you may find your disc tray inexplicably refuses to open. There's a bug where after the first time you insert a disc and eject it, you'll no longer be able to open the disc tray. Run the following command in a terminal to restore it:
Copy to the clipboard in Openbox isn't managed like in other desktop environments. You can copy and paste across applications, but when you quit the application you copied from, its contents in the clipboard disappear. The solution is to install a clipboard manager like Parcellite and put it in your autostart file, though KeePassX users should be aware of this bug that inappropriately preserves your secret passwords in Parcellite's clipboard.
Need a JACK audio server for your audio production software? You may fail to get a connection with
My SSH server is a diva. Over wireless, sometimes it wants to work, sometimes it doesn't. When I attempt to login to icebook.local, I get an error: "ssh: Could not resolve hostname icebook.local: No address associated with nodename". Sometimes logging into the actual IP address works, but sometimes not. The only foolproof fix is to stick an ethernet cable in and login through a wired connection.
I mentioned in Part III, video playback on VLC is broken on G3s as it's compiled with altivec instructions. To solve, you can compile from the official Debian source with the configure option --disable-altivec. So here's a quick howto on compiling from source. After installing the
Then create a folder to download the source code, change your current directory to the new folder, and download the source code with
Then:
and:
Once it's done, while still in ~/Source/vlc-2.0.3, do:
When completed, if you launch VLC in the terminal and get the error, "vlc: error while loading shared libraries: libvlc.so.5: cannot open shared object file: No such file or directory", the fix is detailed here. You simply enter the following three symlink commands:
Now you should have a working VLC.
Parting Tips
Finally, I should probably remind you Openbox users have no force quit button, but you can force quit processes in a terminal by entering "killall -s9 process name". Though in the case of Iceweasel, the process name is "firefox-bin". Good to know.
Another troubleshooting tip: if your system is broken and you need to boot into Single User Mode to fix it, you can do so by typing "Linux single" at the second yaboot screen. You'll eventually be prompted for your root password, and when you're done with any repairs you can type "exit" and it'll logout and continue booting to your normal login manager.
There's one more limitation you should be aware of. Almost no Linux closed-source software works on PowerPC. That's because the companies that produce them only distribute i386 or AMD binaries, so as a consequence titles like Flash, Dropbox, and Skype aren't available for PowerPC. One exceptionis was BitTorrent Sync, which distributes used to distribute a PowerPC .deb file. :)
Well, that's about it. I'll leave you with a few links that you might find of interest:
Debian Mailing Lists -- Index for debian-powerpc
PowerPC/FAQ - Debian Wiki
PowerPCFAQ - Ubuntu Wiki: A wealth of information here. And Ubuntu is based on Debian, so almost all of it applies.
Linux MintPPC | fast and slick Linux for PPC computers (site restored!)
The forums are also a great source of information.
Openbox - Debian Wiki
Best Linux Software: A decent rundown of Linux software.
I'll be updating this post, hopefully with more good news than bad, as time progresses. In the meantime, happy Linuxing!
Part I - Pre-Installation
Part II - Installing the Base System
Part III - Installing the GUI
Part IV - Configuring Stuff
So now you have your system all up and running, but there are a few things that don't quite work right. If you've installed Testing some bugs are to be expected, but there are other bugs and general quirks on PowerPC Linux that have been around a long time and will likely persist.
Boot Parameters
Among those quirks are system freezes from poorly supported drivers. This is where boot parameters come in handy. If your radeon driver is causing you persistent lock-ups, you can restore stability by forcing PCI mode by entering this at the second yaboot screen:
Linux radeon.agpmode=-1The "Linux" tells it to boot the default kernel, and everything that follows are the boot parameters.
One user reports they had system freezes until they entered the parameter "irqpoll", perhaps related to multiple devices being attached.
To make boot parameters permanent so don't have to type them in every time, edit your kernel entries in /etc/yaboot.conf so they look something like this:
image=/boot/vmlinux
    label=Linux
    read-only
    initrd=/boot/initrd.img
append="radeon.agpmode=-1 video=offb:off"Mac OS 9 Issues
Another bug that persists is the infamous disappearing partition bug. Every time you run through the Debian installer, it messes up your Mac OS 9 drivers making any OS 9 partition unbootable. Fortunately there's an easy fix. Simply boot with your Mac OS install CD, launch Drive Setup, highlight your hard drive on the list, and from the Functions menu select "Update Driver". You can now boot into your OS 9 partition.
Another thing you should know about OS 9, never use the Startup Disk control panel to choose a startup disk (this applies to OS X's Startup Disk system preference, too). It messes up Yaboot and you won't be able to boot into Linux. If this should happen, reset the PRAM (hold down command + option + p + r keys on startup). If that still doesn't restore Yaboot, boot with the Option key held down and choose your Linux partition on the boot screen. Then when you're safely in Linux, run "sudo ybin -v" to reset Yaboot.
Dual booting between Linux and Mac OS 9 also has an issue with system clocks. While your Debian system is set to UTC time, your OS 9 system is set to local time, so though your Linux time may be correct, you Mac clock can be several hours off. Solve this with:
sudo timedatectl set-local-rtc 1Replace the 1 with 0 to switch back to UTC time.
Other Issues
Occasionally Debian may install with your system time one hour off (or maybe it's just me and the deb-installer hates me). To correct it, run the
timedatectl command. The example below sets the time to 6:30:00 pm:sudo timedatectl set-time "2014-08-23 18:30:00"As mentioned before, KMS is glitchy and blocks suspend from functioning, so check the Part IV - Graphics section for suggestions.
And with all sound issues, check the Part IV - Sound section for fixes.
There's a new bug afflicting PowerPC Iceweasel users where their bookmark folders aren't showing up in the bookmarks menu or toolbar, though they can still be accessed in the Bookmarks Library and Sidebar (and the bookmarks within them are still accessible with auto-complete).
I've noticed a backlight issue on my iBook. DPMS turns off the backlight after 10 minutes as expected, but the backlight doesn't turn on after I wake it up. The only way I can turn on the screen is to press the brightness keys. This may be because my iBook runs with KMS disabled.
If you have a tray-loading Mac, you may find your disc tray inexplicably refuses to open. There's a bug where after the first time you insert a disc and eject it, you'll no longer be able to open the disc tray. Run the following command in a terminal to restore it:
eject -i offCopy to the clipboard in Openbox isn't managed like in other desktop environments. You can copy and paste across applications, but when you quit the application you copied from, its contents in the clipboard disappear. The solution is to install a clipboard manager like Parcellite and put it in your autostart file, though KeePassX users should be aware of this bug that inappropriately preserves your secret passwords in Parcellite's clipboard.
Need a JACK audio server for your audio production software? You may fail to get a connection with
jackd2. If that's the case, install jackd1 and that should work.My SSH server is a diva. Over wireless, sometimes it wants to work, sometimes it doesn't. When I attempt to login to icebook.local, I get an error: "ssh: Could not resolve hostname icebook.local: No address associated with nodename". Sometimes logging into the actual IP address works, but sometimes not. The only foolproof fix is to stick an ethernet cable in and login through a wired connection.
I mentioned in Part III, video playback on VLC is broken on G3s as it's compiled with altivec instructions. To solve, you can compile from the official Debian source with the configure option --disable-altivec. So here's a quick howto on compiling from source. After installing the
build-essential development package, run:sudo aptitude build-dep vlcThen create a folder to download the source code, change your current directory to the new folder, and download the source code with
apt-get:mkdir ~/Source
cd ~/Source
apt-get source vlcThen:
cd ~/Source/vlc-2.0.3 (or whatever the new folder name happens to be)and:
./configure --disable-altivecOnce it's done, while still in ~/Source/vlc-2.0.3, do:
make

sudo make install
When completed, if you launch VLC in the terminal and get the error, "vlc: error while loading shared libraries: libvlc.so.5: cannot open shared object file: No such file or directory", the fix is detailed here. You simply enter the following three symlink commands:
sudo ln -s /usr/local/lib/libvlc* /usr/lib/

sudo ln -s /usr/local/lib/libx264.a /usr/lib/

sudo ln -s /usr/local/lib/vlc /usr/lib/vlc
Now you should have a working VLC.
Parting Tips
Finally, I should probably remind you Openbox users have no force quit button, but you can force quit processes in a terminal by entering "killall -s9 process name". Though in the case of Iceweasel, the process name is "firefox-bin". Good to know.
Another troubleshooting tip: if your system is broken and you need to boot into Single User Mode to fix it, you can do so by typing "Linux single" at the second yaboot screen. You'll eventually be prompted for your root password, and when you're done with any repairs you can type "exit" and it'll logout and continue booting to your normal login manager.
There's one more limitation you should be aware of. Almost no Linux closed-source software works on PowerPC. That's because the companies that produce them only distribute i386 or AMD binaries, so as a consequence titles like Flash, Dropbox, and Skype aren't available for PowerPC. One exception
Well, that's about it. I'll leave you with a few links that you might find of interest:
Debian Mailing Lists -- Index for debian-powerpc
PowerPC/FAQ - Debian Wiki
PowerPCFAQ - Ubuntu Wiki: A wealth of information here. And Ubuntu is based on Debian, so almost all of it applies.
Linux MintPPC | fast and slick Linux for PPC computers (site restored!)
The forums are also a great source of information.
Openbox - Debian Wiki
Best Linux Software: A decent rundown of Linux software.
I'll be updating this post, hopefully with more good news than bad, as time progresses. In the meantime, happy Linuxing!
Part I - Pre-Installation
Part II - Installing the Base System
Part III - Installing the GUI
Part IV - Configuring Stuff
Friday, March 16, 2012
Installing Debian Linux on PPC Part IV - Configuring Stuff
[4/24/15: Updated for Jessie stable]
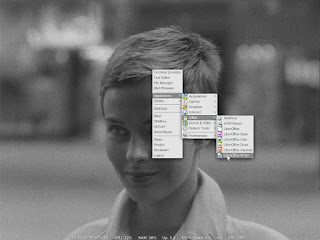
Once you've gotten past the login screen, you will likely be confronted with this as your desktop:

This is Openbox. Now take a minute to let your eyes adjust. I know the visual pizzazz is a bit overwhelming at first. The first thing you may notice is that middle-click brings down a desktop switcher menu and right-click brings down your root menu. The root menu starts off with very few items by default, so the first thing you want to do is add to it. Choose "Terminal emulator" from the root menu, then enter "obmenu".
Now just play with the editor and save changes. Add new items, then fill in the fields for label and execution command (usually the application's name, all lower case). To add a Debian menu with all your applications, install
You can further spruce up your desktop by setting a wallpaper with feh and adding "sh ~/.fehbg &" to your autostart file (see Autostart on Login below). You can manage themes, fonts, and icons with LXAppearance, though you still may notice some things missing, like a taskbar, dock, and desktop icons. And that's the beauty of Openbox. You can add all those yourself, like your own favorite taskbar instead of the one handed to you by the Desktop Environment Gods. Or in low memory configurations, you can stick with the root menu, desktop switcher, and Openbox's Exposé-like keyboard shortcuts, because when push comes to shove that's really all you need.
More:
Sound
Graphics
Monitor Calibration
Wireless
Hotkeys
Swap Command and Control Keys
Trackpad
CPU Frequency Scaling
Speed Tweaks
Fstab
Yaboot
Lock Screen
Launchers, Docks, and Panels
Desktop Icons
Other Desktop Tools
Special Menu
Playing DVDs
Fonts
GTK Themes
Shadows & Transparency
Autostart on Login
Clean Caches
Sound
If sound isn't working out of the box, there are several steps you can take. First, you need a program that can unmute and change your master volume. For that:
Then run
and retry alsamixer. If you now succeed in opening alsamixer, add "snd-aoa-i2sbus" to /etc/modules so the module is loaded after reboot. If, however, alsamixer still fails, skip a couple of paragraphs down to the soundcard detection bug.
Now that you have alsamixer open, unmute the Master Volume by selecting it and pressing the "m" key so the label switches from "MM" to "00", then turn it up with the up-arrow-key. Unmute "Speakers" and also "Headphone Detect Autoswitch" if you see it. Also, if you see a PCM level, turn it up to 75%. I read in an Ubuntu forum that a PCM level above that gives you distortion.
In the past, there was a bug in debian-installer that blacklisted your sound modules. I'm not sure it still applies, but look at the sound section on Ubuntu's PowerPCFAQ in case it's still causing problems.
If you still can't open alsamixer you're probably suffering from a soundcard detection bug in the new kernel that seems to afflict mostly iBooks. Your only choices are to compile a custom kernel with patches (this one and then this one on top of it) that fix this, or boot from Wheezy's 3.2.0-4 kernel that doesn't have the bug. (UPDATE: I've made available a custom Jessie kernel with the sound patches. You can find the download link at this post.)
So here's a quick digression on how to install the 3.2.0-4 kernel. If you've upgraded from an old Wheezy install, you should already have it in your /boot directory. If you don't or are running from a clean Jessie install, you need to add the following line to your /etc/apt/sources.list:
followed by a "sudo aptitude update". Then install "linux-image-3.2.0-4-powerpc" for single processors, "linux-image-3.2.0-4-powerpc-smp" for multiprocessors, or "linux-image-3.2.0-4-powerpc64" for 64 bit processors. Installing this will set it as your default boot kernel, and your previously installed kernel will be labeled "old" (i.e. on the second Yaboot screen, pressing tab will give you boot options "Linux" and "old", "Linux" being your default kernel and "old" being your previously installed kernel). The problem here is if a software upgrade automatically installs a newer kernel, that new kernel will become the default and your 3.2.0-4 kernel will be labeled "old". So to fix that issue, go to this Ubuntu post on how to symlink specific kernels and create permanently labeled sections for them in yaboot.conf. Then to make one of them your permanent default kernel, simply change the order in which they appear in yaboot.conf. Moving your Wheezy kernel section to the top will make it the default. As always, after making changes to yaboot.conf, don't forget to run "sudo ybin -v".
Once you've done all that, comment out or delete the added line in your /etc/apt/sources.list and run another "sudo aptitude update". After a reboot you should be able to open alsamixer.
I should finally mention PulseAudio. Friends don't let friends do PulseAudio. But if you must and you experience stuttering or crackling playback, this looks like a solution. Also, if alsamixer shows PulseAudio is muted after every reboot, you can fix it by installing
Graphics
(This section is mostly about Macs with ATI graphics cards since I don't have any experience with Nvidia cards. Go to the Ubuntu PowerPCFAQ for more on Nvidia. Pretty much that entire FAQ applies to Debian, too. The MintPPC forum is also a good resource. And a note on G5s, the yaboot parameter nouveau.noaccel=1 is sometimes used to get a useable desktop.)
ATI/Radeon:
The first thing is to install
Beginning with Jessie, KMS (Kernel Modesetting) for Radeon cards is enabled by default. What's more, the latest radeon driver has dropped support for non-KMS modesetting, so if you disable KMS because of stability issues, you won't be able to use the radeon driver for even 2D acceleration. Instead, you'll be kicked back to the unaccelerated fbdev driver.
So let's focus on getting KMS and radeon to work for us first. Some caveats: KMS breaks sleep on PowerPC, and it was never adequately tested on PowerPC so it has stability issues. It is, however, the only way to get 3D acceleration; you can use hibernate instead of sleep; and there are workarounds to make it stable.
To first see if KMS is giving you 3D acceleration:
to get the utilities glxgears and glxinfo. Then run:
If you see "OpenGL renderer string: Software Rasterizer" or "libGL error: failed to load driver: ...", you're not getting 3D acceleration, only 2D acceleration. For 3D, you'd see something like, "OpenGL renderer string: Gallium 0.4 on ATI RV350". Seeing "Software Rasterizer" or other errors means you may be suffering from this r300 default depth bug. As a workaround, r300 (ATI 9700) users have to either patch the Mesa source or install these already-patched Ubuntu MATE .debs (link updated). I've tested the MATE .debs and they work fine in Debian. So to install them, unzip the .debs, use the
The "*.deb" means the command applies to all files ending in .deb in your current directory. This will downgrade those mesa packages, so afterward you'll want to pin or hold them to prevent aptitude from automatically installing newer unpatched versions when doing an "aptitude upgrade". Instructions for "holding" a package are at this Ubuntu help page (scroll down to "Introduction to Holding Packages").
Now when you reboot, you should have 3D (big sigh of relief). If you experience system freezes or other stability issues (and you'll know almost instantly), you need to force PCI mode by entering the following boot parameter at your second Yaboot screen:
Note that's a negative one. I've also seen people recommend adding "video=offb:off" to turn off the open firmware framebuffer, but it wasn't necessary on my Powerbook. After testing, you can make these boot parameters permanent by opening /etc/yaboot.conf and adding the line append="boot parameters inside quotes". For example, like this:
Now your Radeon freezing problems should be solved.
There's one issue, though, that no boot parameter will fix. This is the black screen of death. This is something that affects 14" G3 iBooks, but I know of no other models affected. Once booting is finished, the system is active but the screen remains black, even after switching to a console. The only workaround is to reboot and disable KMS to get a working console screen and make some edits to give you (me) a usable desktop. So reboot and enter this at the second Yaboot prompt to disable KMS:
This should take you to a login screen with psychedelic colors, so switch to a console with ctrl + alt + F1 and open /etc/modprobe.d/fbdev-blacklist.conf in a text editor and comment out (prepend with a #) the line "blacklist radeonfb". Then edit the file /etc/modules, adding the line "radeonfb" without quotes. These edits ensure that the radeon framebuffer module loads on boot. Next, reboot and enter this at the second Yaboot prompt:
(video=offb:off is necessary to allow the radeon framebuffer to load) The psychedelic colors should be gone, but you may have only 8-bit colors. If that's the case, switch to a console and kill the X server with:
Then generate a xorg.conf file and open it in a text editor with these commands:
Once in xorg.conf, enter "DefaultDepth 24" under the "Screen" section like this:
Once everything works, make the above boot parameters permanent by adding this append line to your boot kernel in /etc/yaboot.conf:
And then run:
Now on reboot you should have a usable, though slow, desktop. Running Compton in the background will improve window dragging speed, but expect video playback with the fbdev driver to be poor. In MPlayer or VLC you'll be limited to X11 video output only.
ATI Rage 128:
For Rage 128 cards, you also need
Finally, I'll leave some old notes that only apply to Wheezy and Ubuntu's still supported 12.04 LTS:
ATI users first need to install
If this gives you instability issues, you can also force PCI mode by adding "radeon.agpmode=-1" (negative 1). If KMS just doesn't work for you, though, you can try a second method. First, downgrade these four Mesa packages (they're labeled ubuntu but they work the same on Debian):
libgl1-mesa-dri_7.11-0ubuntu3.3_powerpc.deb
libgl1-mesa-glx_7.11-0ubuntu3.3_powerpc.deb
libglapi-mesa_7.11-0ubuntu3.3_powerpc.deb
libglu1-mesa_7.11-0ubuntu3.3_powerpc.deb
Download the .deb files, use the
This assumes there are no other .deb files in that directory (the "*.deb" means the command will apply to all .deb files in that folder). Then reboot, and at the second Yaboot screen enter the following to ensure KMS is disabled:
Now you should have 3D, and you can confirm by installing
As long as the output doesn't say Software Rasterizer, you're good. Now lock the mesa packages to prevent them from updating by following the instructions here (scroll down to "Introduction to Holding Packages"), and make the yaboot parameter permanent by opening /etc/yaboot.conf and adding the line:
at the end of the subsections "image=/boot/vmlinux" and "image=/boot/vmlinux.old", etc., and tabbed in like the other lines. Finally, run "sudo ybin -v" to activate the Yaboot changes.
Monitor Calibration
I've never used hardware calibration, but others report that a Pantone Huey works with Gnome Color Manager. In any event, monitor calibration should look good out of the box, but my old G3 iBook screen looked a little washed out, so I installed Redshift to warm the color temperature a bit. The command I used was this:
That's a capital O, not zero. Once I was happy with what I saw, I added the command to my autostart file so it runs on login (see Autostart on Login below).
Wireless
To get your wireless cards working, you need additional firmware from the "contrib" and "non-free" repositories. First generation Airport card users need to install
If
Next, launch wicd from your Debian menu or with "wicd-client" from a terminal. In preferences, add your wireless interface (as well as your OpenDNS servers I know you're all using 'cause it's good for you). After closing preferences, find your network on the list (you may have to click Refresh), check the "Automatically connect to this network" box, click the Properties button, and add in any preferred IP and DNS settings. Then check the "Use Encryption" box, choose WPA 1/2 (Passphrase), and enter your password. Click OK and you can connect. At some point a network icon should appear in your panel's system tray.
If you can't get a stable connection with wicd, there are a couple of options. You can reboot and hope the problem magically fixes itself (this sometimes works). You can also disable or uninstall wicd and set up a connection from the command line. Instructions are detailed at Debian's wifi wiki. Basically, the steps are:
and then add the wireless section detailed in the wiki to the interfaces file. Then execute "sudo ifup wlan0" and your connection should be up, and automatically up after reboot. This may be more stable but not very flexible. There are instructions at this Debuntu page to configure wifi roaming, but first generation Airport cards don't seem to work with it.
Also on the subject of first generation Airport cards' shortcomings, they only support WPA + TKIP router security. They don't support WPA + AES, or WPA2 in any configuration.
Hotkeys
PBButtonsd takes care of this. To edit the PBButtonsd config file:
Reading it, it should mostly make sense. The LCD_Brightness line is commented out by default, so uncomment it if you want the setting to carry over on restart. Also, if sleep on your machine is broken, don't forget to change the suspend options here to prevent it.
A few more notes. First, aluminum Powerbook users need to add "i2c-dev" to /etc/modules to get your keyboard backlight keys working. Second, you can install
And if your hotkeys still won't work and you're about to go insane, try them in conjunction with the fn key.
Swap Command and Control Keys
You can have your command and control keys behave like a Mac's by swapping them. Open a text editor and enter the following text:
Save the file as .Xmodmap (don't forget the leading dot) in your home directory, then run the command:
The above configuration works on my Powerbook. If the xmodmap command gives you errors, it's probably because you have an iBook which maps its command and control keys slightly differently. This is the text that works on my iBook:
Once everything works, add the above xmodmap command to your autostart file (see Autostart on Login below). A couple of notes: This will only work in an X session. If you switch to a console, your keys will revert. Also, restarting the mouseemu daemon (like if you change mouseemu's settings) may break this until you rerun "xmodmap ~/.Xmodmap".
Trackpad
To change the tap-to-click setting on your trackpad, you can use, ironically enough, the
Replace the "notap" with "tap" to turn it on. "man trackpad" gives you all the options. To have your settings carry over after reboot, you can create a startup script with:
and enter these two lines in the new file:
After saving it, you make it executable like this:
and then add it to your boot scripts with:
You may see a warning about missing LSB information and overrides, but you can ignore it. See this Debian article about removing the script if you no longer want it.
Also, trackpads on later iBooks and Powerbooks can add multi-touch gestures by setting up the "Synaptics" driver. I wrote a post on this for my Aluminum Powerbook.
CPU Frequency Scaling
For x86 users, CPU frequency scaling is handled by the kernel, but PowerPC users need to installhere new link here. You can install by downloading it, then
You can see it working by running:
to display your current CPU frequency, and:
to list available frequencies. Note: my laptops have two available frequencies, full power and 50% power, but my Sawtooth's 7400 chip has only one frequency, which means powernowd is somewhat useless on it.
Speed Tweaks
There are a few speed tweaks you can use to improve application responsiveness. First, as mentioned in Part II - Installing the Base System, you should use the mount option "noatime". It should be in your /etc/fstab file as one of the options on your Linux partition. If it's not there, add it. Not doing so will make your hard drive perform slower than it should. Also, there are a couple of things you can add to your /etc/sysctl.conf file. Open it with a sudo nano and add the following two lines at the bottom:
The default values are 60 and 100, respectively. Changing them will make your system less likely to swap to disk until it really needs to. I've seen some people recommend a swappiness value of 10 for desktop users, others say 20. If you're running a server, you should probably stick with the defaults, but desktop users will definitely want to lower them.
Fstab
Now let's edit our fstab file to auto-mount our Mac partitions on startup. First you need to create mount points like this:
These commands create new directories in the /mnt directory called MacOS and Media. You can name yours whatever you want, but these are mine. Then open your fstab file with:
and add new lines at the end, for each partition you want to mount. In my case, this:
Put tabs between all the entries, not spaces. You can look up your own partition numbers by running "sudo mac-fdisk -l" (that's -l for list). They're either going to be /dev/hdaN or /dev/sdaN. And if you want read/write access to hfsplus volumes, you need to do a few extra things. First, make sure journaling is turned off on your OS X partition (OS 9 partitions don't have journaling). Then install
If you still don't have write access, you may need to run fsck.hfsplus (a disk repair utility, installed by hfsprogs), so unmount the volume:
while noting there's no "un" in umount. Then run:
Finally you can reboot, or remount with the "rw" and "user" options like this:
One last note, you can write to a journaled OS X volume with the mount option "force", not that it's a good idea.
Yaboot
To configure boot options and set which system is the default, you need to edit /etc/yaboot.conf. It's good practice to back it up before editing since making a mistake here can have disastrous consequences, so:
Then open /etc/yaboot.conf in a text editor:
Find the main section with options like "timeout" and "enablecdboot". If you're dual booting OS 9 and you don't see macos= (or macosx= for OS X), then add it yourself with the line:
with yourmacpartition found with "sudo mac-fdisk -l". Subsequently, your MacOS will appear as a boot option alongside Linux. To set which OS boots by default after the timeout, add the line "defaultos=macosx" or "defaultos=macos" (without quotes). If you add no line, yaboot will automatically boot into Linux. And about the timeout, if it's too long you can change the value where increments of 10 equal one second. Finally save the file, and this is important, anytime you make changes to yaboot.conf you must run:
for the changes to register. Run that and you're done.
Lock Screen
What do we do with a problem like XScreensaver? Its ugly lock screen is stuck in the '90s, and it's kind of entertaining reading its longtime maintainer stubbornly refuse to change it in bug report threads. But it's still ugly and people actually avoid whole distributions that include it by default. My solution is to not install it (See the beauty of building from the ground up?). Instead, I let DPMS take care of powering off the screen; your screen automatically shuts off after 10 minutes of inactivity unless overridden by another screensaver. For a lock screen, I use
Another screen locker with a bit more customization is i3lock. Here's an i3 thread that talks about taking a screenshot, blurring it, and using it as the screen lock image. Cool idea, but read the comments on how to mitigate certain security concerns.
One more cool idea is to have your Mac wake from hibernate with the lock screen activated. Do this by having your hibernate menu command point to a script file containing this:
Replace "slock" with your screen locker of choice, save it as something.sh, and make it executable with:
Launchers, Docks, and Panels
If right-clicking the desktop to bring down a root menu isn't your thing, you can add a Quicksilver-like capability with Kupfer. Just like Quicksilver, Kupfer is an application launcher that does much more, like locate and open files, search the web, etc. You can set its preferences to start automatically on login, and it's reasonably lightweight. An even lighter-weight option is
As far as docks and panels go, LXPanel can be a good approximation for a Tiger dock. By default it looks like a Windows taskbar, but you can transform it in the panel's preferences. There's also Cairo-dock, a more Leopard-like 3D dock, though it's a bit buggy and overweight in features. For a lightweight but slick-looking panel and system tray, Tint2 is the answer to your call.
Desktop Icons
If you want to go further in achieving a more Mac-like interface, you can add icons to your desktop. There's the PCManFM or xfdesktop way detailed at this Crunchbang wiki, though they may not be satisfactory. PCManFM's desktop is prone to crashing, and xfdesktop copies your files dragged to the desktop rather than moving them (Why? Just why?).
For an alternative, you can try Rox-filer's pinboard. This will give you icons on your desktop, though they're iconified links; the actual files stay in their original folders. You can also add application launchers by dragging their /usr/share/applications/*.desktop files to the desktop. I wrote all about integrating Rox-filer on your desktop if you're interested.
Other Desktop Tools
So you probably want a few more desktop tools, starting with a system monitor. The best choice is Conky. It's very configurable and you can download other people's conkyrc files to tinker with (link to mine is at the bottom of this post). Just be aware, other people's battery monitor syntax is usually Intel only, but I posted this solution for PowerPC users.
You don't have Spotlight on your new desktop, but you can get something similar with Tracker. (UPDATE: this uses a ton of CPU, so it's probably not worth it) It's a search indexer that comes with a gui frontend, so install
Another search program, that has the advantage of not constantly indexing your drive, is Searchmonkey. It's a frontend for
One cool feature OS X users are familiar with is the ability to right-click on a word to bring up a built-in dictionary. Linux users can have this with Artha. An offline dictionary, it runs in the background when you set it as a startup item, and you bring it up by highlighting a word and hitting a hotkey combination. Just make sure to dismiss the Artha window with close and not the quit button, because the quit button will quit the program.
Special Menu
In Openbox you have to manually add menu items for shutdown and reboot, etc., so why not add a Mac OS 9-style Special menu? Here's how to do it. In Jessie, you can now use
There's one more important step: give these menu items popup boxes to prevent accidental shutdowns, etc., and ruining your unsaved work. You do this by opening ~/.config/openbox/menu.xml and adding the "<prompt>" option to each item along with the dialogue in the popup you want. For example, my Special menu items look like this:
Now when you save this and choose Reconfigure, your new Special menu should appear.
Playing DVDs
If you want to play copy-protected commercial DVDs, you need to install
and add the single line:
Then run the commands:
Ignore the scary language about untrusted packages and complete the install.
Fonts
You can make your fonts look nicer, especially in a web browser, by creating a ".fonts.conf" file. Open your text editor and paste in the following:
GTK Themes
If you've noticed GTK3 applications like Transmission and Abiword aren't following the theming you set in LXAppearance, it's because GTK3 applications aren't compatible with GTK2-only themes. To make everything consistent, choose a theme that's compatible with both GTK2 and GTK3. Zukitwo is one such theme. Make sure you have its required engines installed, then download it and unpack it to your ~/.themes folder (create the folder if it doesn't exist) and fire up LXAppearance to choose it. This should automatically insert a gtk-3.0 folder inside ~/.config, but if it doesn't you can add it manually like this (single line):
Now your theme will be consistent across all GTK2 and GTK3 applications. And a Zukitwo Openbox theme is here, too.
There's also the problem of qt apps like VLC defaulting to the ugly Windows '95 theme, and to fix that you can install
Shadows & Transparency
Want fancy decorations like shadows and transparency? You need
Then start it up with:
The -b option runs it as a background daemon. To enable all the effects you want, edit ~/.config/compton.conf, and run "killall compton && compton -b" to test your edits. I've linked to my compton.conf file at the bottom of this post. It creates shadows, background window transparency, and slight menu transparency.
Once you're happy with everything, add it to your autostart file.
Note: if your graphics configuration is giving you extremely slow window dragging, running Compton should help with that.
Autostart on Login
In order to have "compton -b" (and any other command) autostart on login, you must add it to an autostart file. Openbox's system-wide autostart file is /etc/xdg/openbox/autostart, but your user autostart is ~/.config/openbox/autostart. If it's not already there, create it with:
with a dot before config, and add your text. Mine looks like this:
Always add an "&" to the end of every command in this file. Otherwise, programs after it may not run.
Clean Caches
One last thing to do, if you have limited disk space, is to clear your aptitude cache. All .deb packages you download are stored there enabling you to reinstall something without re-downloading it, but they're not essential so you can clear them out with:
And with that, my to-do list is pretty much exhausted. Here are a few screenshots, the first of Openbox's root menu with an applications menu added, and also Conky at the bottom of the screen:
Here's a Synapse launcher in the foreground with Iceweasel and Audacious in the background:

And here's a more Mac-like interface with PCManFM drawing icons on the desktop and Cairo-dock on the bottom:
My GTK theme is FlatStudioLight and my Openbox theme is EasyGray, slightly modded. If you're interested, here's my conkyrc file (for 1024x768 screens), my compton.conf (shadows, background windows transparent, slight menu transparency), my tint2rc (autohide, left side of screen), and two themerc files for EasyGray, one to match the FlatStudioLight GTK theme, and one to match FlatStudioGray.
Next is the final part of this series, "Bugs & Quirks".
Part I - Pre-Installation
Part II - Installing the Base System
Part III - Installing the GUI
Part V - Bugs & Quirks
Once you've gotten past the login screen, you will likely be confronted with this as your desktop:

This is Openbox. Now take a minute to let your eyes adjust. I know the visual pizzazz is a bit overwhelming at first. The first thing you may notice is that middle-click brings down a desktop switcher menu and right-click brings down your root menu. The root menu starts off with very few items by default, so the first thing you want to do is add to it. Choose "Terminal emulator" from the root menu, then enter "obmenu".
Now just play with the editor and save changes. Add new items, then fill in the fields for label and execution command (usually the application's name, all lower case). To add a Debian menu with all your applications, install
menu-xdg and then select "Reconfigure" from the root menu. Also, here's a nice video tutorial for adding a dynamic applications menu with icons (must have build-essential installed). For further creativity, you can add shortcuts for hibernate, restart, and shutdown, detailed below. And don't miss this great resource for Openbox, Urukrama's Openbox guide.You can further spruce up your desktop by setting a wallpaper with feh and adding "sh ~/.fehbg &" to your autostart file (see Autostart on Login below). You can manage themes, fonts, and icons with LXAppearance, though you still may notice some things missing, like a taskbar, dock, and desktop icons. And that's the beauty of Openbox. You can add all those yourself, like your own favorite taskbar instead of the one handed to you by the Desktop Environment Gods. Or in low memory configurations, you can stick with the root menu, desktop switcher, and Openbox's Exposé-like keyboard shortcuts, because when push comes to shove that's really all you need.
More:
Sound
Graphics
Monitor Calibration
Wireless
Hotkeys
Swap Command and Control Keys
Trackpad
CPU Frequency Scaling
Speed Tweaks
Fstab
Yaboot
Lock Screen
Launchers, Docks, and Panels
Desktop Icons
Other Desktop Tools
Special Menu
Playing DVDs
Fonts
GTK Themes
Shadows & Transparency
Autostart on Login
Clean Caches
Sound
If sound isn't working out of the box, there are several steps you can take. First, you need a program that can unmute and change your master volume. For that:
sudo aptitude install alsa-base alsa-utilsThen run
alsamixer in a terminal window. If it fails to open the mixer, run the following:sudo modprobe snd-aoa-i2sbusand retry alsamixer. If you now succeed in opening alsamixer, add "snd-aoa-i2sbus" to /etc/modules so the module is loaded after reboot. If, however, alsamixer still fails, skip a couple of paragraphs down to the soundcard detection bug.
Now that you have alsamixer open, unmute the Master Volume by selecting it and pressing the "m" key so the label switches from "MM" to "00", then turn it up with the up-arrow-key. Unmute "Speakers" and also "Headphone Detect Autoswitch" if you see it. Also, if you see a PCM level, turn it up to 75%. I read in an Ubuntu forum that a PCM level above that gives you distortion.
In the past, there was a bug in debian-installer that blacklisted your sound modules. I'm not sure it still applies, but look at the sound section on Ubuntu's PowerPCFAQ in case it's still causing problems.
If you still can't open alsamixer you're probably suffering from a soundcard detection bug in the new kernel that seems to afflict mostly iBooks. Your only choices are to compile a custom kernel with patches (this one and then this one on top of it) that fix this, or boot from Wheezy's 3.2.0-4 kernel that doesn't have the bug. (UPDATE: I've made available a custom Jessie kernel with the sound patches. You can find the download link at this post.)
So here's a quick digression on how to install the 3.2.0-4 kernel. If you've upgraded from an old Wheezy install, you should already have it in your /boot directory. If you don't or are running from a clean Jessie install, you need to add the following line to your /etc/apt/sources.list:
deb http://security.debian.org/debian-security wheezy/updates mainfollowed by a "sudo aptitude update". Then install "linux-image-3.2.0-4-powerpc" for single processors, "linux-image-3.2.0-4-powerpc-smp" for multiprocessors, or "linux-image-3.2.0-4-powerpc64" for 64 bit processors. Installing this will set it as your default boot kernel, and your previously installed kernel will be labeled "old" (i.e. on the second Yaboot screen, pressing tab will give you boot options "Linux" and "old", "Linux" being your default kernel and "old" being your previously installed kernel). The problem here is if a software upgrade automatically installs a newer kernel, that new kernel will become the default and your 3.2.0-4 kernel will be labeled "old". So to fix that issue, go to this Ubuntu post on how to symlink specific kernels and create permanently labeled sections for them in yaboot.conf. Then to make one of them your permanent default kernel, simply change the order in which they appear in yaboot.conf. Moving your Wheezy kernel section to the top will make it the default. As always, after making changes to yaboot.conf, don't forget to run "sudo ybin -v".
Once you've done all that, comment out or delete the added line in your /etc/apt/sources.list and run another "sudo aptitude update". After a reboot you should be able to open alsamixer.
I should finally mention PulseAudio. Friends don't let friends do PulseAudio. But if you must and you experience stuttering or crackling playback, this looks like a solution. Also, if alsamixer shows PulseAudio is muted after every reboot, you can fix it by installing
pavucontrol (a gtk volume control app) and unclicking the mute button under Output Devices.Graphics
(This section is mostly about Macs with ATI graphics cards since I don't have any experience with Nvidia cards. Go to the Ubuntu PowerPCFAQ for more on Nvidia. Pretty much that entire FAQ applies to Debian, too. The MintPPC forum is also a good resource. And a note on G5s, the yaboot parameter nouveau.noaccel=1 is sometimes used to get a useable desktop.)
ATI/Radeon:
The first thing is to install
firmware-linux-nonfree from the non-free repository if you haven't already--this contains firmware for many ATI cards. (Just don't reboot quite yet, or you may encounter a graphics lock-up at your login screen. Read a little further down for the boot parameter "radeon.agpmode=-1" on how to deal with that.)Beginning with Jessie, KMS (Kernel Modesetting) for Radeon cards is enabled by default. What's more, the latest radeon driver has dropped support for non-KMS modesetting, so if you disable KMS because of stability issues, you won't be able to use the radeon driver for even 2D acceleration. Instead, you'll be kicked back to the unaccelerated fbdev driver.
So let's focus on getting KMS and radeon to work for us first. Some caveats: KMS breaks sleep on PowerPC, and it was never adequately tested on PowerPC so it has stability issues. It is, however, the only way to get 3D acceleration; you can use hibernate instead of sleep; and there are workarounds to make it stable.
To first see if KMS is giving you 3D acceleration:
sudo aptitude install mesa-utilsto get the utilities glxgears and glxinfo. Then run:
LIBGL_DEBUG=verbose glxinfo | grep renderIf you see "OpenGL renderer string: Software Rasterizer" or "libGL error: failed to load driver: ...", you're not getting 3D acceleration, only 2D acceleration. For 3D, you'd see something like, "OpenGL renderer string: Gallium 0.4 on ATI RV350". Seeing "Software Rasterizer" or other errors means you may be suffering from this r300 default depth bug. As a workaround, r300 (ATI 9700) users have to either patch the Mesa source or install these already-patched Ubuntu MATE .debs (link updated). I've tested the MATE .debs and they work fine in Debian. So to install them, unzip the .debs, use the
cd command to change your current directory to where the .deb files are, and then run:sudo dpkg -i *.debThe "*.deb" means the command applies to all files ending in .deb in your current directory. This will downgrade those mesa packages, so afterward you'll want to pin or hold them to prevent aptitude from automatically installing newer unpatched versions when doing an "aptitude upgrade". Instructions for "holding" a package are at this Ubuntu help page (scroll down to "Introduction to Holding Packages").
Now when you reboot, you should have 3D (big sigh of relief). If you experience system freezes or other stability issues (and you'll know almost instantly), you need to force PCI mode by entering the following boot parameter at your second Yaboot screen:
Linux radeon.agpmode=-1Note that's a negative one. I've also seen people recommend adding "video=offb:off" to turn off the open firmware framebuffer, but it wasn't necessary on my Powerbook. After testing, you can make these boot parameters permanent by opening /etc/yaboot.conf and adding the line append="boot parameters inside quotes". For example, like this:
image=/boot/vmlinux
    label=Linux
    read-only
    initrd=/boot/initrd.img
append="video=offb:off radeon.agpmode=-1"Now your Radeon freezing problems should be solved.
There's one issue, though, that no boot parameter will fix. This is the black screen of death. This is something that affects 14" G3 iBooks, but I know of no other models affected. Once booting is finished, the system is active but the screen remains black, even after switching to a console. The only workaround is to reboot and disable KMS to get a working console screen and make some edits to give you (me) a usable desktop. So reboot and enter this at the second Yaboot prompt to disable KMS:
Linux nomodesetThis should take you to a login screen with psychedelic colors, so switch to a console with ctrl + alt + F1 and open /etc/modprobe.d/fbdev-blacklist.conf in a text editor and comment out (prepend with a #) the line "blacklist radeonfb". Then edit the file /etc/modules, adding the line "radeonfb" without quotes. These edits ensure that the radeon framebuffer module loads on boot. Next, reboot and enter this at the second Yaboot prompt:
Linux nomodeset video=offb:off(video=offb:off is necessary to allow the radeon framebuffer to load) The psychedelic colors should be gone, but you may have only 8-bit colors. If that's the case, switch to a console and kill the X server with:
sudo /etc/init.d/lightdm stop (replace lightdm with whatever your login manager is)Then generate a xorg.conf file and open it in a text editor with these commands:
sudo Xorg -configure

sudo cp /root/xorg.conf.new /etc/X11/xorg.conf

sudo nano /etc/X11/xorg.conf
Once in xorg.conf, enter "DefaultDepth 24" under the "Screen" section like this:
Section "Screen"
     Identifier "Screen0"
     Device     "Card0"
     Monitor    "Monitor0"
     DefaultDepth    24
...Once everything works, make the above boot parameters permanent by adding this append line to your boot kernel in /etc/yaboot.conf:
append="nomodeset video=offb:off"And then run:
sudo ybin -vNow on reboot you should have a usable, though slow, desktop. Running Compton in the background will improve window dragging speed, but expect video playback with the fbdev driver to be poor. In MPlayer or VLC you'll be limited to X11 video output only.
ATI Rage 128:
For Rage 128 cards, you also need
firmware-linux-nonfree. If the resulting desktop gives you garbled or jumbled text, you need to generate a xorg.conf file and add this line to the "Device" section: Option "RenderAccel" "false" HorizSync 31.0 - 81.0
VertRefresh 56.0 - 76.0Section "Screen"
Identifier "Screen0"
Monitor "Monitor0"
Device "Device0"
SubSection "Display"
Depth 24
Modes "1280x1024"
EndSubSection
EndSectionFinally, I'll leave some old notes that only apply to Wheezy and Ubuntu's still supported 12.04 LTS:
ATI users first need to install
firmware-linux-nonfree for required firmware. At this point, Radeon users will have excellent 2D acceleration with the radeon driver, but if you want 3D working there are two ways to do it. First, you can activate KMS by entering the following boot parameters at your second Yaboot screen:Linux video=radeonfb:off radeon.modeset=1If this gives you instability issues, you can also force PCI mode by adding "radeon.agpmode=-1" (negative 1). If KMS just doesn't work for you, though, you can try a second method. First, downgrade these four Mesa packages (they're labeled ubuntu but they work the same on Debian):
libgl1-mesa-dri_7.11-0ubuntu3.3_powerpc.deb
libgl1-mesa-glx_7.11-0ubuntu3.3_powerpc.deb
libglapi-mesa_7.11-0ubuntu3.3_powerpc.deb
libglu1-mesa_7.11-0ubuntu3.3_powerpc.deb
Download the .deb files, use the
cd command to change your current directory to the directory of the .deb files, and then run the following:sudo dpkg -i *.debThis assumes there are no other .deb files in that directory (the "*.deb" means the command will apply to all .deb files in that folder). Then reboot, and at the second Yaboot screen enter the following to ensure KMS is disabled:
Linux radeon.modeset=0Now you should have 3D, and you can confirm by installing
mesa-utils, then running:glxinfo | grep renderAs long as the output doesn't say Software Rasterizer, you're good. Now lock the mesa packages to prevent them from updating by following the instructions here (scroll down to "Introduction to Holding Packages"), and make the yaboot parameter permanent by opening /etc/yaboot.conf and adding the line:
append="radeon.modeset=0" (don't forget the quotes)at the end of the subsections "image=/boot/vmlinux" and "image=/boot/vmlinux.old", etc., and tabbed in like the other lines. Finally, run "sudo ybin -v" to activate the Yaboot changes.
Monitor Calibration
I've never used hardware calibration, but others report that a Pantone Huey works with Gnome Color Manager. In any event, monitor calibration should look good out of the box, but my old G3 iBook screen looked a little washed out, so I installed Redshift to warm the color temperature a bit. The command I used was this:
redshift -O 6200That's a capital O, not zero. Once I was happy with what I saw, I added the command to my autostart file so it runs on login (see Autostart on Login below).
Wireless
To get your wireless cards working, you need additional firmware from the "contrib" and "non-free" repositories. First generation Airport card users need to install
firmware-linux-nonfree, while Airport Extreme users need firmware-b43-installer. There's also firmware-b43legacy-installer, but I'm not clear which cards, if any, require that.If
wireless-tools and wpasupplicant aren't already installed, do that, too. Then install wicd, a simple graphical client to set things up. You will also need your wireless interface, which can be found with "sudo iwconfig" (you may need to reboot after installing the firmware). The wireless interface should be eth1 or wlan0.Next, launch wicd from your Debian menu or with "wicd-client" from a terminal. In preferences, add your wireless interface (as well as your OpenDNS servers I know you're all using 'cause it's good for you). After closing preferences, find your network on the list (you may have to click Refresh), check the "Automatically connect to this network" box, click the Properties button, and add in any preferred IP and DNS settings. Then check the "Use Encryption" box, choose WPA 1/2 (Passphrase), and enter your password. Click OK and you can connect. At some point a network icon should appear in your panel's system tray.
If you can't get a stable connection with wicd, there are a couple of options. You can reboot and hope the problem magically fixes itself (this sometimes works). You can also disable or uninstall wicd and set up a connection from the command line. Instructions are detailed at Debian's wifi wiki. Basically, the steps are:
sudo chmod 0600 /etc/network/interfaces

wpa_passphrase your-ssid your-passphrase

sudo nano /etc/network/interfaces
and then add the wireless section detailed in the wiki to the interfaces file. Then execute "sudo ifup wlan0" and your connection should be up, and automatically up after reboot. This may be more stable but not very flexible. There are instructions at this Debuntu page to configure wifi roaming, but first generation Airport cards don't seem to work with it.
Also on the subject of first generation Airport cards' shortcomings, they only support WPA + TKIP router security. They don't support WPA + AES, or WPA2 in any configuration.
Hotkeys
PBButtonsd takes care of this. To edit the PBButtonsd config file:
sudo nano /etc/pbbuttonsd.confReading it, it should mostly make sense. The LCD_Brightness line is commented out by default, so uncomment it if you want the setting to carry over on restart. Also, if sleep on your machine is broken, don't forget to change the suspend options here to prevent it.
A few more notes. First, aluminum Powerbook users need to add "i2c-dev" to /etc/modules to get your keyboard backlight keys working. Second, you can install
laptop-mode-tools to enable pbbuttonsd to spin down your hard drive when on battery, but often the spin down rate is too aggressive and can shorten the lifetime of the drive, so be wary. And third, your screen brightness on reboot will be determined by the LCD_Brightness setting in pbbuttonsd.conf. Your brightness levels changed by the hotkeys won't be "remembered."And if your hotkeys still won't work and you're about to go insane, try them in conjunction with the fn key.
Swap Command and Control Keys
You can have your command and control keys behave like a Mac's by swapping them. Open a text editor and enter the following text:
remove Mod4 = Super_L Super_R

remove Control = Control_L Control_R

keysym Control_L = Super_L

keysym Control_R = Super_R

keysym Super_L = Control_L

keysym Super_R = Control_R

add Mod4 = Super_L Super_R

add Control = Control_L Control_R
Save the file as .Xmodmap (don't forget the leading dot) in your home directory, then run the command:
xmodmap ~/.XmodmapThe above configuration works on my Powerbook. If the xmodmap command gives you errors, it's probably because you have an iBook which maps its command and control keys slightly differently. This is the text that works on my iBook:
remove Mod4 = Super_L

remove Control = Control_L

keysym Control_L = Super_L

keysym Super_L = Control_L

add Mod4 = Super_L

add Control = Control_L
Once everything works, add the above xmodmap command to your autostart file (see Autostart on Login below). A couple of notes: This will only work in an X session. If you switch to a console, your keys will revert. Also, restarting the mouseemu daemon (like if you change mouseemu's settings) may break this until you rerun "xmodmap ~/.Xmodmap".
Trackpad
To change the tap-to-click setting on your trackpad, you can use, ironically enough, the
trackpad command (this didn't work on my aluminum Powerbook, see the Synaptics link at end of this section to use a synaptics.conf to enable tap-to-click). To turn off tap-to-click:sudo trackpad notapReplace the "notap" with "tap" to turn it on. "man trackpad" gives you all the options. To have your settings carry over after reboot, you can create a startup script with:
sudo nano /etc/init.d/trackpadand enter these two lines in the new file:
#!/bin/sh

trackpad notap
After saving it, you make it executable like this:
sudo chmod 0755 /etc/init.d/trackpadand then add it to your boot scripts with:
sudo update-rc.d trackpad defaultsYou may see a warning about missing LSB information and overrides, but you can ignore it. See this Debian article about removing the script if you no longer want it.
Also, trackpads on later iBooks and Powerbooks can add multi-touch gestures by setting up the "Synaptics" driver. I wrote a post on this for my Aluminum Powerbook.
CPU Frequency Scaling
For x86 users, CPU frequency scaling is handled by the kernel, but PowerPC users need to install
powernowd for this power-saving feature (extending your laptop's battery and possibly quieting your fans). It adjusts to CPU load, so you won't notice any performance slowdowns, and though the defaults work fine, you can edit /etc/default/powernowd to customize (UPDATE: Debian maintainers removed this from their repositories because..., but reader Eric H pointed me to a powernowd.deb file kept cd to its current directory, and run "sudo dpkg -i powernowd_1.00-1.1+b1_powerpc.deb").You can see it working by running:
cat /sys/devices/system/cpu/cpu0/cpufreq/scaling_cur_freqto display your current CPU frequency, and:
cat /sys/devices/system/cpu/cpu0/cpufreq/scaling_available_frequenciesto list available frequencies. Note: my laptops have two available frequencies, full power and 50% power, but my Sawtooth's 7400 chip has only one frequency, which means powernowd is somewhat useless on it.
Speed Tweaks
There are a few speed tweaks you can use to improve application responsiveness. First, as mentioned in Part II - Installing the Base System, you should use the mount option "noatime". It should be in your /etc/fstab file as one of the options on your Linux partition. If it's not there, add it. Not doing so will make your hard drive perform slower than it should. Also, there are a couple of things you can add to your /etc/sysctl.conf file. Open it with a sudo nano and add the following two lines at the bottom:
vm.swappiness=10

vm.vfs_cache_pressure=50
The default values are 60 and 100, respectively. Changing them will make your system less likely to swap to disk until it really needs to. I've seen some people recommend a swappiness value of 10 for desktop users, others say 20. If you're running a server, you should probably stick with the defaults, but desktop users will definitely want to lower them.
Fstab
Now let's edit our fstab file to auto-mount our Mac partitions on startup. First you need to create mount points like this:
sudo mkdir /mnt/MacOS

sudo mkdir /mnt/Media
These commands create new directories in the /mnt directory called MacOS and Media. You can name yours whatever you want, but these are mine. Then open your fstab file with:
sudo nano /etc/fstaband add new lines at the end, for each partition you want to mount. In my case, this:
/dev/sda10 /mnt/MacOS hfsplus defaults 0 0

/dev/sda11 /mnt/Media hfsplus defaults 0 0
Put tabs between all the entries, not spaces. You can look up your own partition numbers by running "sudo mac-fdisk -l" (that's -l for list). They're either going to be /dev/hdaN or /dev/sdaN. And if you want read/write access to hfsplus volumes, you need to do a few extra things. First, make sure journaling is turned off on your OS X partition (OS 9 partitions don't have journaling). Then install
hfsprogs and hfsutils and change "defaults" to "rw,user" in /etc/fstab for your partition. Finally, reboot.If you still don't have write access, you may need to run fsck.hfsplus (a disk repair utility, installed by hfsprogs), so unmount the volume:
sudo umount /mnt/yourmountpointwhile noting there's no "un" in umount. Then run:
sudo fsck.hfsplus -f /dev/sdaNFinally you can reboot, or remount with the "rw" and "user" options like this:
sudo mount -t hfsplus -o rw,user /dev/sdaN /mnt/yourmountpointOne last note, you can write to a journaled OS X volume with the mount option "force", not that it's a good idea.
Yaboot
To configure boot options and set which system is the default, you need to edit /etc/yaboot.conf. It's good practice to back it up before editing since making a mistake here can have disastrous consequences, so:
sudo cp /etc/yaboot.conf ~/yaboot-bak.confThen open /etc/yaboot.conf in a text editor:
sudo nano /etc/yaboot.confFind the main section with options like "timeout" and "enablecdboot". If you're dual booting OS 9 and you don't see macos= (or macosx= for OS X), then add it yourself with the line:
macos=/dev/yourmacpartitionwith yourmacpartition found with "sudo mac-fdisk -l". Subsequently, your MacOS will appear as a boot option alongside Linux. To set which OS boots by default after the timeout, add the line "defaultos=macosx" or "defaultos=macos" (without quotes). If you add no line, yaboot will automatically boot into Linux. And about the timeout, if it's too long you can change the value where increments of 10 equal one second. Finally save the file, and this is important, anytime you make changes to yaboot.conf you must run:
sudo ybin -vfor the changes to register. Run that and you're done.
Lock Screen
What do we do with a problem like XScreensaver? Its ugly lock screen is stuck in the '90s, and it's kind of entertaining reading its longtime maintainer stubbornly refuse to change it in bug report threads. But it's still ugly and people actually avoid whole distributions that include it by default. My solution is to not install it (See the beauty of building from the ground up?). Instead, I let DPMS take care of powering off the screen; your screen automatically shuts off after 10 minutes of inactivity unless overridden by another screensaver. For a lock screen, I use
slock, part of the suckless-tools package. I also install xautolock and put the following in my autostart file to activate the lock screen after 30 minutes of inactivity:xautolock -time 30 -locker "slock" &Another screen locker with a bit more customization is i3lock. Here's an i3 thread that talks about taking a screenshot, blurring it, and using it as the screen lock image. Cool idea, but read the comments on how to mitigate certain security concerns.
One more cool idea is to have your Mac wake from hibernate with the lock screen activated. Do this by having your hibernate menu command point to a script file containing this:
#!/bin/bash


systemctl hibernate && slock
Replace "slock" with your screen locker of choice, save it as something.sh, and make it executable with:
chmod u+x /path/to/something.sh (the "u+x" making it executable for just you the user)Launchers, Docks, and Panels
If right-clicking the desktop to bring down a root menu isn't your thing, you can add a Quicksilver-like capability with Kupfer. Just like Quicksilver, Kupfer is an application launcher that does much more, like locate and open files, search the web, etc. You can set its preferences to start automatically on login, and it's reasonably lightweight. An even lighter-weight option is
dmenu from the suckless-tools package. Also, Synapse seems to be back from the dead and is available in Stretch.As far as docks and panels go, LXPanel can be a good approximation for a Tiger dock. By default it looks like a Windows taskbar, but you can transform it in the panel's preferences. There's also Cairo-dock, a more Leopard-like 3D dock, though it's a bit buggy and overweight in features. For a lightweight but slick-looking panel and system tray, Tint2 is the answer to your call.
Desktop Icons
If you want to go further in achieving a more Mac-like interface, you can add icons to your desktop. There's the PCManFM or xfdesktop way detailed at this Crunchbang wiki, though they may not be satisfactory. PCManFM's desktop is prone to crashing, and xfdesktop copies your files dragged to the desktop rather than moving them (Why? Just why?).
For an alternative, you can try Rox-filer's pinboard. This will give you icons on your desktop, though they're iconified links; the actual files stay in their original folders. You can also add application launchers by dragging their /usr/share/applications/*.desktop files to the desktop. I wrote all about integrating Rox-filer on your desktop if you're interested.
Other Desktop Tools
So you probably want a few more desktop tools, starting with a system monitor. The best choice is Conky. It's very configurable and you can download other people's conkyrc files to tinker with (link to mine is at the bottom of this post). Just be aware, other people's battery monitor syntax is usually Intel only, but I posted this solution for PowerPC users.
You don't have Spotlight on your new desktop, but you can get something similar with Tracker. (UPDATE: this uses a ton of CPU, so it's probably not worth it) It's a search indexer that comes with a gui frontend, so install
tracker-gui and aptitude will take care of all the dependencies. The command "tracker-needle" launches the search GUI, and "tracker-preferences" launches the preferences (you may need to enter "tracker-control -s" to start indexing).Another search program, that has the advantage of not constantly indexing your drive, is Searchmonkey. It's a frontend for
find and grep and can be quite powerful.One cool feature OS X users are familiar with is the ability to right-click on a word to bring up a built-in dictionary. Linux users can have this with Artha. An offline dictionary, it runs in the background when you set it as a startup item, and you bring it up by highlighting a word and hitting a hotkey combination. Just make sure to dismiss the Artha window with close and not the quit button, because the quit button will quit the program.
Special Menu
In Openbox you have to manually add menu items for shutdown and reboot, etc., so why not add a Mac OS 9-style Special menu? Here's how to do it. In Jessie, you can now use
systemd commands for shutdown and reboot, etc., without sudo, so no more "sudo shutdown now -r". You can find the whole list at this Arch Wiki. Armed with that, open obmenu and select New Menu and name it "Special". Then add items to it for Empty Trash..., Restart, Shutdown, etc. I'm using Rox-filer which technically has no trash folder, so the "Empty Trash..." is purely decorative;) But if you have a trash folder in Thunar or PCManFM, installing trash-cli and then entering the command trash-empty might be the trick.There's one more important step: give these menu items popup boxes to prevent accidental shutdowns, etc., and ruining your unsaved work. You do this by opening ~/.config/openbox/menu.xml and adding the "<prompt>" option to each item along with the dialogue in the popup you want. For example, my Special menu items look like this:
<item label="Empty Trash...">
    <action name="Execute">
        <execute>command</execute>
        <prompt>Permanently remove the files in
your trash?</prompt>
    </action>
</item>
<separator/>
<item label="Lock Screen">
    <action name="Execute">
        <execute>slock</execute>
    </action>
</item>
<item label="Logout">
    <action name="Exit"/>
</item>
<separator/>
<item label="Hibernate">
    <action name="Execute">
        <execute>systemctl hibernate</execute>
        <prompt>Set the computer to hibernate?
</prompt>
 </action>
</item>
<item label="Restart">
    <action name="Execute">
        <execute>systemctl reboot</execute>
        <prompt>Restart the computer?</prompt>
    </action>
</item>
<item label="Shut Down">
    <action name="Execute">
        <execute>systemctl poweroff</execute>
        <prompt>Shutdown the computer?</prompt>
    </action>
</item>
Now when you save this and choose Reconfigure, your new Special menu should appear.
Playing DVDs
If you want to play copy-protected commercial DVDs, you need to install
libdvdcss2 from the Deb-Multimedia repository. If you haven't already, add the repository to your sources list with:sudo nano /etc/apt/sources.listand add the single line:
deb http://www.deb-multimedia.org jessie mainThen run the commands:
sudo aptitude update

sudo aptitude install deb-multimedia-keyring

sudo aptitude install libdvdcss2
Ignore the scary language about untrusted packages and complete the install.
Fonts
You can make your fonts look nicer, especially in a web browser, by creating a ".fonts.conf" file. Open your text editor and paste in the following:
<?xml version="1.0"?>
<!DOCTYPE fontconfig SYSTEM "fonts.dtd">
<fontconfig>
 <match target="font" >
  <edit mode="assign" name="autohint" >
   <bool>true</bool>
  </edit>
 </match>
 <match target="font" >
  <edit mode="assign" name="hinting" >
   <bool>true</bool>
  </edit>
 </match>
 <match target="font" >
  <edit mode="assign" name="hintstyle" >
   <const>hintslight</const>
  </edit>
 </match>
 <match target="font" >
  <edit mode="assign" name="rgba" >
   <const>rgb</const>
  </edit>
 </match>
 <match target="font" >
  <edit mode="assign" name="antialias" >
   <bool>true</bool>
  </edit>
 </match>
<match target="font">
   <edit mode="assign" name="lcdfilter">
   <const>lcddefault</const>
   </edit>
 </match>
</fontconfig>
GTK Themes
If you've noticed GTK3 applications like Transmission and Abiword aren't following the theming you set in LXAppearance, it's because GTK3 applications aren't compatible with GTK2-only themes. To make everything consistent, choose a theme that's compatible with both GTK2 and GTK3. Zukitwo is one such theme. Make sure you have its required engines installed, then download it and unpack it to your ~/.themes folder (create the folder if it doesn't exist) and fire up LXAppearance to choose it. This should automatically insert a gtk-3.0 folder inside ~/.config, but if it doesn't you can add it manually like this (single line):
sudo cp -r ~/.themes/Zukitwo/gtk-3.0 ~/.config/gtk-3.0Now your theme will be consistent across all GTK2 and GTK3 applications. And a Zukitwo Openbox theme is here, too.
There's also the problem of qt apps like VLC defaulting to the ugly Windows '95 theme, and to fix that you can install
qt4-qtconfig. Its launch command is "qtconfig", and you can have it set all your qt apps to follow your GTK theme or several other choices.Shadows & Transparency
Want fancy decorations like shadows and transparency? You need
compton for that:sudo aptitude install comptonThen start it up with:
compton -bThe -b option runs it as a background daemon. To enable all the effects you want, edit ~/.config/compton.conf, and run "killall compton && compton -b" to test your edits. I've linked to my compton.conf file at the bottom of this post. It creates shadows, background window transparency, and slight menu transparency.
Once you're happy with everything, add it to your autostart file.
Note: if your graphics configuration is giving you extremely slow window dragging, running Compton should help with that.
Autostart on Login
In order to have "compton -b" (and any other command) autostart on login, you must add it to an autostart file. Openbox's system-wide autostart file is /etc/xdg/openbox/autostart, but your user autostart is ~/.config/openbox/autostart. If it's not already there, create it with:
nano ~/.config/openbox/autostartwith a dot before config, and add your text. Mine looks like this:
# swap command and control keys

xmodmap ~/.Xmodmap &


# have Rox draw wallpaper and desktop icons

rox --pinboard=MyPinboard &


# draw the same wallpaper with feh to fix a

# Conky bug.

sh ~/.fehbg &


# warm the color temperature on my washed-out,

# ancient iBook display

redshift -O 6200 &


# shadows and transparency

compton -b &


# automount external devices to /media

udisks-glue &


# system monitor

conky &


# offline desktop dictionary

artha &


# system tray volume icon

volumeicon &


# run slock after 30 minutes inactivity

xautolock -time 30 -locker "slock" &


# 2s delay ensures tint2 transparency

(sleep 2s && tint2) &
Always add an "&" to the end of every command in this file. Otherwise, programs after it may not run.
Clean Caches
One last thing to do, if you have limited disk space, is to clear your aptitude cache. All .deb packages you download are stored there enabling you to reinstall something without re-downloading it, but they're not essential so you can clear them out with:
sudo aptitude cleanAnd with that, my to-do list is pretty much exhausted. Here are a few screenshots, the first of Openbox's root menu with an applications menu added, and also Conky at the bottom of the screen:

Here's a Synapse launcher in the foreground with Iceweasel and Audacious in the background:

And here's a more Mac-like interface with PCManFM drawing icons on the desktop and Cairo-dock on the bottom:

My GTK theme is FlatStudioLight and my Openbox theme is EasyGray, slightly modded. If you're interested, here's my conkyrc file (for 1024x768 screens), my compton.conf (shadows, background windows transparent, slight menu transparency), my tint2rc (autohide, left side of screen), and two themerc files for EasyGray, one to match the FlatStudioLight GTK theme, and one to match FlatStudioGray.
Next is the final part of this series, "Bugs & Quirks".
Part I - Pre-Installation
Part II - Installing the Base System
Part III - Installing the GUI
Part V - Bugs & Quirks
Wednesday, March 14, 2012
Installing Debian Linux on PPC Part III - Installing the GUI
[4/24/15: Updated for Jessie stable]
By now you should be booted into your new system (if you're dual booting OS 9 and you didn't see a "MacOS" option in yaboot, see how to add it manually in Part IV). You're past the startup dialogues and are staring at a terminal prompt, yourhostname
Here you want to type
We logged in as root because in order to get administrative access through your user account, you have to install the
Aptitude is the installer program we'll be using. Other people may use apt-get, but they're basically the same. Once it's done installing, type
and just below it add the line:
yourusername
Then save changes with ctrl + o (and name it "/etc/sudoers" not "/etc/sudoers.tmp"), exit with ctrl + x, and finally logout of your root session by typing
At the next prompt, type your username and user password and you should be logged in with sudo capabilities. Incidentally, if you want to take a break here, enter:
and this will shutdown your computer.
But if you're still here, now's the time to install your GUI. Again, you could install "lxde" or "xfce4" here, but for our purposes (fastest performance, obsessive DIYism) we're going with Openbox. At a terminal prompt, type on one line:
What it all means:
1) Xorg provides the X window server.
2) Slim is a slim and fast login manager (LightDM is a more popular, but sometimes troublesome, choice).
3) Openbox, obconf, and obmenu are what you need for Openbox.
4) menu-xdg provides a Debian applications menu.
5) The murrine and pixbuf engines are required by many third-party themes.
6) fonts-freefont-otf and fonts-linuxlibertine provide some extra fonts I like.
7) LXAppearance manages your themes, fonts, and icons.
Enter your password and watch the install happen. Once done, we can move on to installing applications, but let's take care of a couple of things first. First, edit your apt sources:
In here, you'll want to add extra repositories by adding "contrib" and "non-free" to each of the entries like this (single line):
Make sure they all end in
to update to your new repositories. That last update step is required every time you change your sources list, and it's a good idea to run it before installing any new software.
Next, if you have a first-generation Airport card or an ATI graphics card you need to install non-free firmware*, and you also may want to add the Microsoft fonts installer for fonts many web pages use (single line):
*Note: With firmware-linux-nonfree installed, Radeon users may get graphics lock-ups unless you force PCI mode at boot, i.e. at the second Yaboot screen, type "Linux radeon.agpmode=-1" without quotes. This is explained more in Part IV - Graphics.
Meanwhile, the mscorefonts installer will auto-launch and take a bit to install all the fonts.
Now we can install some applications. Since my laptop is going to be used for web surfing, writing, and music/video, I'm going to install just a basic set by typing on one line:
1) Iceweasel and Icedove are Firefox and Thunderbird rebranded.
2) QupZilla is a full-featured webkit browser. To set your system's default browser, check this page (Note: QupZilla doesn't receive security updates like Iceweasel does).
3) Sabnzbdplus and Transmission (execute command is transmission-gtk, FYI) are for Usenet and BitTorrent.
4) Audacious is a really cool, lightweight music player (or if you like console apps, there's Cmus which supports internet radio streaming, too).
5) mpv, MPlayer, and VLC are media players (See below for adding deb-multimedia apt sources as MPlayer is no longer in the official repositories. G3 users will need to compile VLC from source without Altivec--see Part V for more on that.).
6) SMTube is a Youtube viewer.
7) Pluma is basically the old Gedit without all the Gnome dependencies.
8) LibreOffice is for those of us who can't abide by Abiword, and libreoffice-gtk ensures LibreOffice uses your GTK theme.
9) Fotoxx is a lightweight image editor.
10) Shutter is a versatile Skitch replacement and screenshot utility.
11) Mirage and Evince are for viewing pics and pdfs, while Xournal offers basic pdf editing.
12) Asunder is a CD ripper and encoder.
13) Rox-filer is a lightning-fast file manager that I wrote about here (Thunar and PCManFM are two other relatively lightweight alternatives).
14) XArchiver is a GUI tool for unpacking zips and tars, etc.
15) LXTerminal is a close equivalent to OS X's Terminal.app.
16) default-jre installs open-source java (replace jre with jdk if you intend to develop java applications), and icedtea-plugin is a java web plug-in (some people report they need to disable this in Iceweasel because it causes their cpu to jump to 100%).
17) FileZilla I use for SFTP-ing between Macs.
18) Gufw is a simple firewall utility that requires root access, so you launch it with "gksudo gufw" (gksudo is installed with the gksu package).
As noted earlier, you need the unofficial Deb-Multimedia repositories to install MPlayer and a bunch of other multimedia packages which Debian's official repositories don't carry for licensing reasons. Go to www.deb-multimedia.org and follow the instructions, which are basically:
a) Add one of the deb-multimedia repositories to your /etc/apt/sources.list, then run "sudo aptitude update".
b) Install
c) Ignore scary-sounding warnings about untrusted packages and install MPlayer.
I should also tell you about a little aptitude trick. There's a disc burning application called Brasero that I want, but when you install it the normal way it pulls in Yelp, a Gnome help guide, which I don't need. So to avoid that, try (on one line):
and it'll leave out recommended extras without interfering with the basic functions of the program.
Once all that's done, you're ready to enter your GUI. Just note that right and middle click are mapped by
So to get to our GUI, type "systemctl reboot" to restart. I hope I didn't forget anything...
Coming up next, Part IV - Configuring Stuff. Be there or be square!
Part I - Pre-Installation
Part II - Installing the Base System
Part IV - Configuring Stuff
Part V - Bugs & Quirks
By now you should be booted into your new system (if you're dual booting OS 9 and you didn't see a "MacOS" option in yaboot, see how to add it manually in Part IV). You're past the startup dialogues and are staring at a terminal prompt, yourhostname
login: _Here you want to type
root, then enter your root password. Now you're logged in as root with all the superpowers that come with it. Don't let it go to your head, though. You'll only be the root user momentarily.We logged in as root because in order to get administrative access through your user account, you have to install the
sudo package first. So at the command prompt, type:aptitude install sudoAptitude is the installer program we'll be using. Other people may use apt-get, but they're basically the same. Once it's done installing, type
visudo at the next prompt and you'll see a text file to edit. Navigate down to the line:root ALL=(ALL:ALL) ALLand just below it add the line:
yourusername
ALL=(ALL:ALL) ALLThen save changes with ctrl + o (and name it "/etc/sudoers" not "/etc/sudoers.tmp"), exit with ctrl + x, and finally logout of your root session by typing
logout.At the next prompt, type your username and user password and you should be logged in with sudo capabilities. Incidentally, if you want to take a break here, enter:
systemctl poweroffand this will shutdown your computer.
But if you're still here, now's the time to install your GUI. Again, you could install "lxde" or "xfce4" here, but for our purposes (fastest performance, obsessive DIYism) we're going with Openbox. At a terminal prompt, type on one line:
sudo aptitude install xorg slim openbox obconf obmenu menu-xdg gtk2-engines-murrine gtk2-engines-pixbuf fonts-freefont-otf fonts-linuxlibertine lxappearanceWhat it all means:
1) Xorg provides the X window server.
2) Slim is a slim and fast login manager (LightDM is a more popular, but sometimes troublesome, choice).
3) Openbox, obconf, and obmenu are what you need for Openbox.
4) menu-xdg provides a Debian applications menu.
5) The murrine and pixbuf engines are required by many third-party themes.
6) fonts-freefont-otf and fonts-linuxlibertine provide some extra fonts I like.
7) LXAppearance manages your themes, fonts, and icons.
Enter your password and watch the install happen. Once done, we can move on to installing applications, but let's take care of a couple of things first. First, edit your apt sources:
sudo nano /etc/apt/sources.listIn here, you'll want to add extra repositories by adding "contrib" and "non-free" to each of the entries like this (single line):
deb http://ftp.us.debian.org/debian/ jessie main contrib non-freeMake sure they all end in
main contrib non-free. Then save and exit, and run: sudo aptitude updateto update to your new repositories. That last update step is required every time you change your sources list, and it's a good idea to run it before installing any new software.
Next, if you have a first-generation Airport card or an ATI graphics card you need to install non-free firmware*, and you also may want to add the Microsoft fonts installer for fonts many web pages use (single line):
sudo aptitude install firmware-linux-nonfree ttf-mscorefonts-installer*Note: With firmware-linux-nonfree installed, Radeon users may get graphics lock-ups unless you force PCI mode at boot, i.e. at the second Yaboot screen, type "Linux radeon.agpmode=-1" without quotes. This is explained more in Part IV - Graphics.
Meanwhile, the mscorefonts installer will auto-launch and take a bit to install all the fonts.
Now we can install some applications. Since my laptop is going to be used for web surfing, writing, and music/video, I'm going to install just a basic set by typing on one line:
sudo aptitude install iceweasel icedove qupzilla sabnzbdplus transmission audacious mpv mplayer vlc smtube pluma libreoffice libreoffice-gtk fotoxx shutter mirage evince xournal asunder rox-filer xarchiver lxterminal default-jre icedtea-plugin filezilla gufw gksu1) Iceweasel and Icedove are Firefox and Thunderbird rebranded.
2) QupZilla is a full-featured webkit browser. To set your system's default browser, check this page (Note: QupZilla doesn't receive security updates like Iceweasel does).
3) Sabnzbdplus and Transmission (execute command is transmission-gtk, FYI) are for Usenet and BitTorrent.
4) Audacious is a really cool, lightweight music player (or if you like console apps, there's Cmus which supports internet radio streaming, too).
5) mpv, MPlayer, and VLC are media players (See below for adding deb-multimedia apt sources as MPlayer is no longer in the official repositories. G3 users will need to compile VLC from source without Altivec--see Part V for more on that.).
6) SMTube is a Youtube viewer.
7) Pluma is basically the old Gedit without all the Gnome dependencies.
8) LibreOffice is for those of us who can't abide by Abiword, and libreoffice-gtk ensures LibreOffice uses your GTK theme.
9) Fotoxx is a lightweight image editor.
10) Shutter is a versatile Skitch replacement and screenshot utility.
11) Mirage and Evince are for viewing pics and pdfs, while Xournal offers basic pdf editing.
12) Asunder is a CD ripper and encoder.
13) Rox-filer is a lightning-fast file manager that I wrote about here (Thunar and PCManFM are two other relatively lightweight alternatives).
14) XArchiver is a GUI tool for unpacking zips and tars, etc.
15) LXTerminal is a close equivalent to OS X's Terminal.app.
16) default-jre installs open-source java (replace jre with jdk if you intend to develop java applications), and icedtea-plugin is a java web plug-in (some people report they need to disable this in Iceweasel because it causes their cpu to jump to 100%).
17) FileZilla I use for SFTP-ing between Macs.
18) Gufw is a simple firewall utility that requires root access, so you launch it with "gksudo gufw" (gksudo is installed with the gksu package).
As noted earlier, you need the unofficial Deb-Multimedia repositories to install MPlayer and a bunch of other multimedia packages which Debian's official repositories don't carry for licensing reasons. Go to www.deb-multimedia.org and follow the instructions, which are basically:
a) Add one of the deb-multimedia repositories to your /etc/apt/sources.list, then run "sudo aptitude update".
b) Install
deb-multimedia-keyring.c) Ignore scary-sounding warnings about untrusted packages and install MPlayer.
I should also tell you about a little aptitude trick. There's a disc burning application called Brasero that I want, but when you install it the normal way it pulls in Yelp, a Gnome help guide, which I don't need. So to avoid that, try (on one line):
sudo aptitude install brasero --without-recommendsand it'll leave out recommended extras without interfering with the basic functions of the program.
Once all that's done, you're ready to enter your GUI. Just note that right and middle click are mapped by
mouseemu to F10 and F11 (or on some keyboards F11 and F12) by default. You can change these by editing /etc/default/mouseemu and restarting the daemon with "sudo /etc/init.d/mouseemu restart". Xev and showkey are two command-line tools to get keycodes from (showkey must be run in an actual console, not a terminal emulator).So to get to our GUI, type "systemctl reboot" to restart. I hope I didn't forget anything...
Coming up next, Part IV - Configuring Stuff. Be there or be square!
Part I - Pre-Installation
Part II - Installing the Base System
Part IV - Configuring Stuff
Part V - Bugs & Quirks
Tuesday, March 13, 2012
Installing Debian Linux on PPC Part II - Installing the Base System
[4/24/15: Updated for Jessie stable]
Now that you have your newly burned and scorching hot install disc handy, put it in and boot your Mac holding down the "c" key. The first screen will have a few rudimentary instructions including how to choose your desktop environment (Gnome, KDE, LXDE, XFCE), but for an Openbox install I skipped that and just pressed return at the boot prompt. The next few screens are pretty self-explanatory, asking for language and keyboard settings. Just pay attention to the navigation instructions on the bottom showing how to use the tab, spacebar, and enter keys.
Next, you may see a screen that asks if you want to install nonfree firmware. I think this is due to first generation Airport cards needing nonfree firmware installed in order to work, and you need the Airport card to work if you're installing over a wireless connection. However, since I have an ethernet connection, I was able to answer no and move on. I'll set up wireless after I've installed the base system. For more information on this, check Debian's install manual and the section, "Loading Missing Firmware".
Now the installer will prompt for a hostname. This is what you want your computer to be called (I'll call mine "icebook"). Then it asks for a domain name, which I have no need for so I left it blank. Then it asks for a root password, your full name, username, and user password. Remember your passwords! Then after you choose your time zone, you're taken to the real meat of the installer--the Debian partitioner.
If you're installing a Debian-only system, you can use Guided Partitioning here. But if you're dual booting OS 9 or OS X, you'll want to select Manual Partitioning. When you next see the partition table, use the arrow keys to navigate down to your Debian partition (IMPORTANT: Don't change the small Apple partition(s) at the beginning of the table. OS X machines should have only one, but OS 9 machines can have eight.). If your Debian partition isn't already labeled "Free Space", press return and then choose "Delete the partition". When you return to the partition table, your Debian partition should say "Free Space". Now you will create the bootloader, swap, and root partitions.
Navigate down to Free Space, press return, and select "Create a new partition". Enter 1 MB for the size, to be created at the beginning of the partition. Then name it "Apple_Bootstrap". For "Use as:" select "NewWorld boot partition", then set the bootable flag to "On". Then select "Done setting up the partition" and you'll see the bootloader partition in your new partition table.
Next, create a swap partition following basically the same procedure. Go down to Free Space, create a new partition, enter the size (should be at least as much as your physical RAM for hibernate to work properly), at the beginning of the partition, but for "Use as:" select "swap area". Then select "Done setting up the partition" and see the new partition table.
Finally, begin the same procedure to make your root partition. Go down to Free Space, create new, and for size use the maximum remaining space (unless you're one of those weirdos who uses a separate partition for your home folder /wink). Name it something like "debian". For "Use as:" select "Ext4 journaling file system". For mount point, choose "/ - the root file system". For mount options, select "noatime" by ticking it with the spacebar. Finally you can select "Done setting up the partition" and see your completed partition table. Don't worry about the few kilobytes of free space at the end.
Now you can finally choose "Finish partitioning and write changes to disk." Use the tab key to select yes and press return.
This is when the actual installation begins. Here it will install the base system and, after a bit, ask you to enter your country and select an archive mirror. When it asked for proxy info, I left it blank since I'm not using one. The next question to come up is "Participate in package usage survey?" Answer yes because it's always good to let the mothership know there are PowerPC users out there.
On a subsequent page you'll be asked to choose additional software to install. Here you'll notice "Debian desktop environment" is checked by default. This will install whichever desktop environment you chose--which you could totally do. I'm not judging you, really. But if you want to install Openbox without all the extra cruft, uncheck this box by pressing the spacebar. You can always install XFCE later if you insist ;) Just make sure "Standard system utilities", "Print server", and "SSH server" are checked, then use the tab key to navigate to "Continue" and press return.
When the installation finally completes, the CD will eject and you can press return to boot into your new system.
Next part, "Installing the GUI". Hope to see you soon!
Part I - Pre-Installation
Part III - Installing the GUI
Part IV - Configuring Stuff
Part V - Bugs & Quirks
Monday, March 12, 2012
Installing Debian Linux on PPC Part I - Pre-Installation
[4/24/15: Updated for Jessie stable]
I've been meaning to do this for awhile, so I've finally gotten around to giving you my thoroughly complete guide to installing Linux on your old iBook, Powerbook, Mini, or Power Mac. This will be an epic told in five parts: Pre-Installation, Installing the Base System, Installing the GUI, Configuring Stuff, and Bugs & Quirks. There are a few distributions out there that already do much of the work for you--MintPPC, Lubuntu, and Ubuntu MATE--but I'm going straight to the source and installing Debian. In fact, I'm gonna go for a custom install using Openbox as my window manager for a faster, leaner system, and also because this kind of build-from-the-ground-up approach is a great way to learn Linux. So let's get to it!
For my particular install, I'll be dual-booting Debian and Mac OS 9 on an iBook G3 with 640 MB of RAM. If you want to dual boot OS X, the same basically applies, and although this guide will be laptop-centric, most of the steps here apply to desktops, too.
The first thing to do is backup your data because you'll be reformatting your hard drive in order to repartition it. After you've backed everything up, boot your computer with an OS 9 (or OS X) installation disc by inserting it and pressing the "c" key. Then, find the Utilities folder and run Drive Setup (or Disk Utility if you're booting an OS X disc). Next, select your hard drive from the list and click "Initialize...", then click "Custom Setup..."
How many partitions to create for dual-booting? At least two, but I'm choosing three, one for Debian, one for Mac OS 9, and one as a sharing partition (if you intend to install Debian alone, you can choose one partition). The reason for three? Though your Mac partitions are visible in Linux, your Linux partition is not in OS 9. So I like to have a sharing partition I can access from both systems. Also, OS X's journaled filesystem will only mount as read-only in Linux, and mounting Linux partitions in the OS X Finder can be a pain, so again, you may prefer having a sharing partition easily writable between both systems (Somewhat related, there's this Lifehacker tutorial on symlinking your OS X home folder into your Linux home folder for shared access on the same computer).
Back to Drive Setup, I'm choosing three partitions, then choosing their sizes and filesystems. The first (top) partition on the table must be your Debian partition. Choose the size, then choose "Unallocated" for the filesystem type (I suppose it doesn't matter which type since you'll be deleting that partition in the Debian installer later). Then set the sizes of your OS 9 and sharing partitions and choose HFS Plus for their filesystems. OS X users running Disc Utility will want to choose "Mac OS Extended (Journaled)" for their OS X partition and "Mac OS Extended" for any OS 9 or sharing partitions. Also, if you're triple booting with OS 9 and OS X, put them on separate partitions. If they're on the same one, they'll need the native Mac startup disk chooser to know which to boot, and that will conflict with the Linux bootloader.
Once I was done, I had three partitions, one unallocated, one for OS 9, and one for sharing data between systems. From there, I initialized the disk and saw the two HFS Plus partitions show up on my desktop. Now you can install OS 9 (or OS X). You must install the Mac OS first, before Debian, because Mac system installers don't play well with Linux systems already on disk. Reboot and check that everything works, and now you can proceed to the one step missing from all this--getting the Debian install disc!
So go over to Debian.org and find an ISO to download. There are three branches to choose from: Stable, Testing, and Sid (unstable). Stable gives you rock-solid stability, Testing is a bit more adventurous, and Sid is the bleeding edge, may-make-your-system-fry choice. The Stable branch netinstall ISO can be found on this page, and the Testing installer can be downloaded here (for both, choose the ISO ending in "...powerpc-netinst.iso"). If you have to ask how to install Sid, you probably shouldn't be using Sid.
The only thing left is to burn a disc or make a USB stick. People say to burn at a slow speed since Linux install discs can be fickle, so when in Rome...
One more note, a longstanding bug in the Debian installer messes up Apple driver partitions and will temporarily make your OS 9 partition unbootable (OS 9 only, doesn't affect OS X partitions). There's a simple fix for this, however, that is detailed in "Part V - Bugs & Quirks".
I'll see you in our next episode, "Installing the Base System".
Part II - Installing the Base System
Part III - Installing the GUI
Part IV - Configuring Stuff
Part V - Bugs & Quirks
Subscribe to:
Posts (Atom)

